To enable Neo Agent to interact with your Autotask system, you first need to create a dedicated security level with the appropriate permissions across all relevant modules.Documentation Index
Fetch the complete documentation index at: https://docs.neoagent.io/llms.txt
Use this file to discover all available pages before exploring further.
How Neo Agent Permissions Work
Neo Agent uses two layers of access control to keep your Autotask data safe:- Autotask Security Level (what you configure here) — sets the maximum API access available, just like setting up any technician account.
- Neo Agent Dashboard — where you choose exactly what Neo can do. You configure permission groups that control which areas Neo can read, write, or ignore — and whether actions require technician approval first.
Creating the Security Level
Navigate to Security Levels
Go to Admin → Organization Settings & Users → Resources/Users (HR) → Security Levels and click to create a new security level.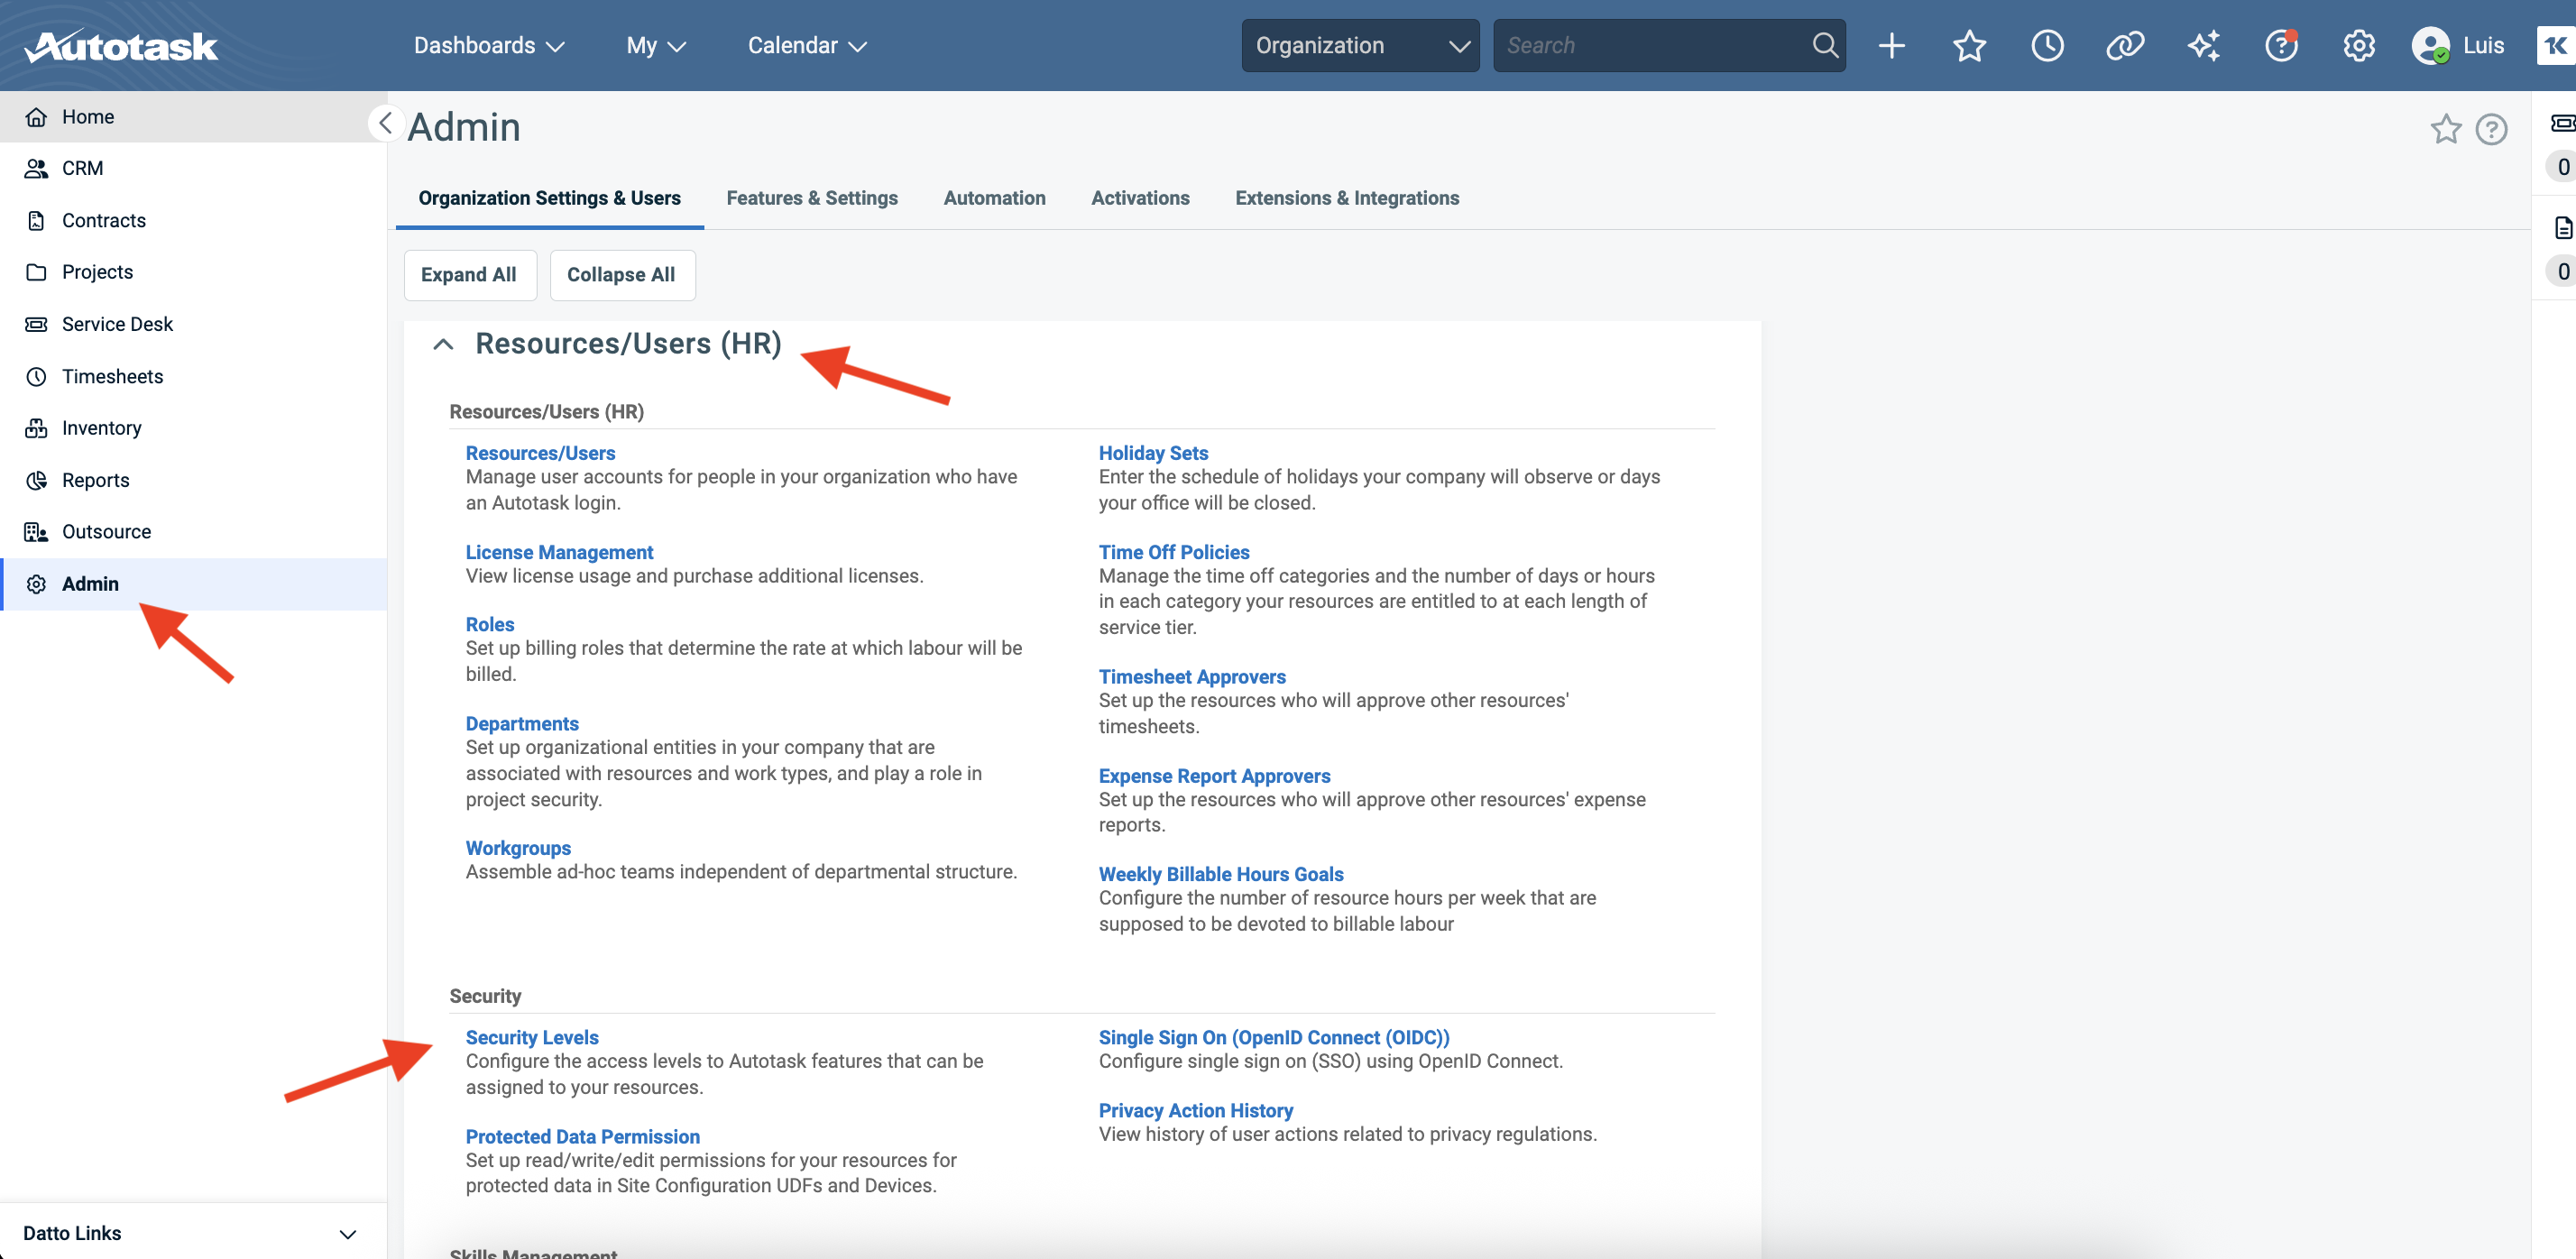
Name the security level
Name the new security level “Neo API User” or similar to clearly identify it as the dedicated role for Neo Agent. Set the License Type to API User.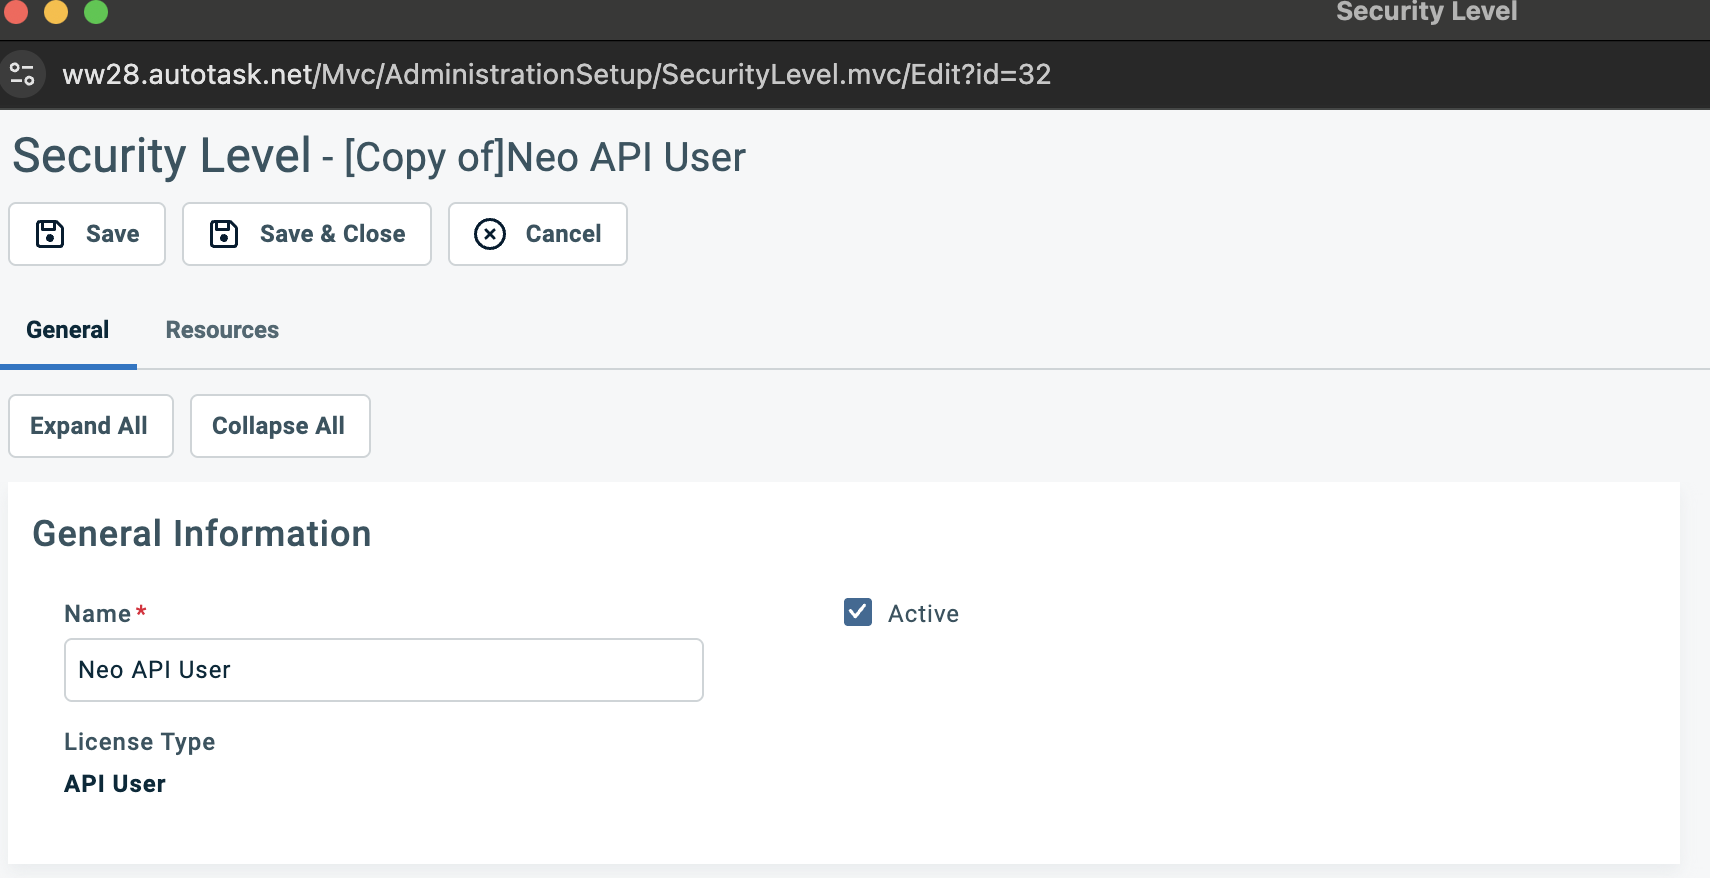
Grant read access across all sections
Scroll down past the General Information and Feature/Section Access to find the permission sections. Each section is collapsible and has a “Full Permission” link in the top-right corner.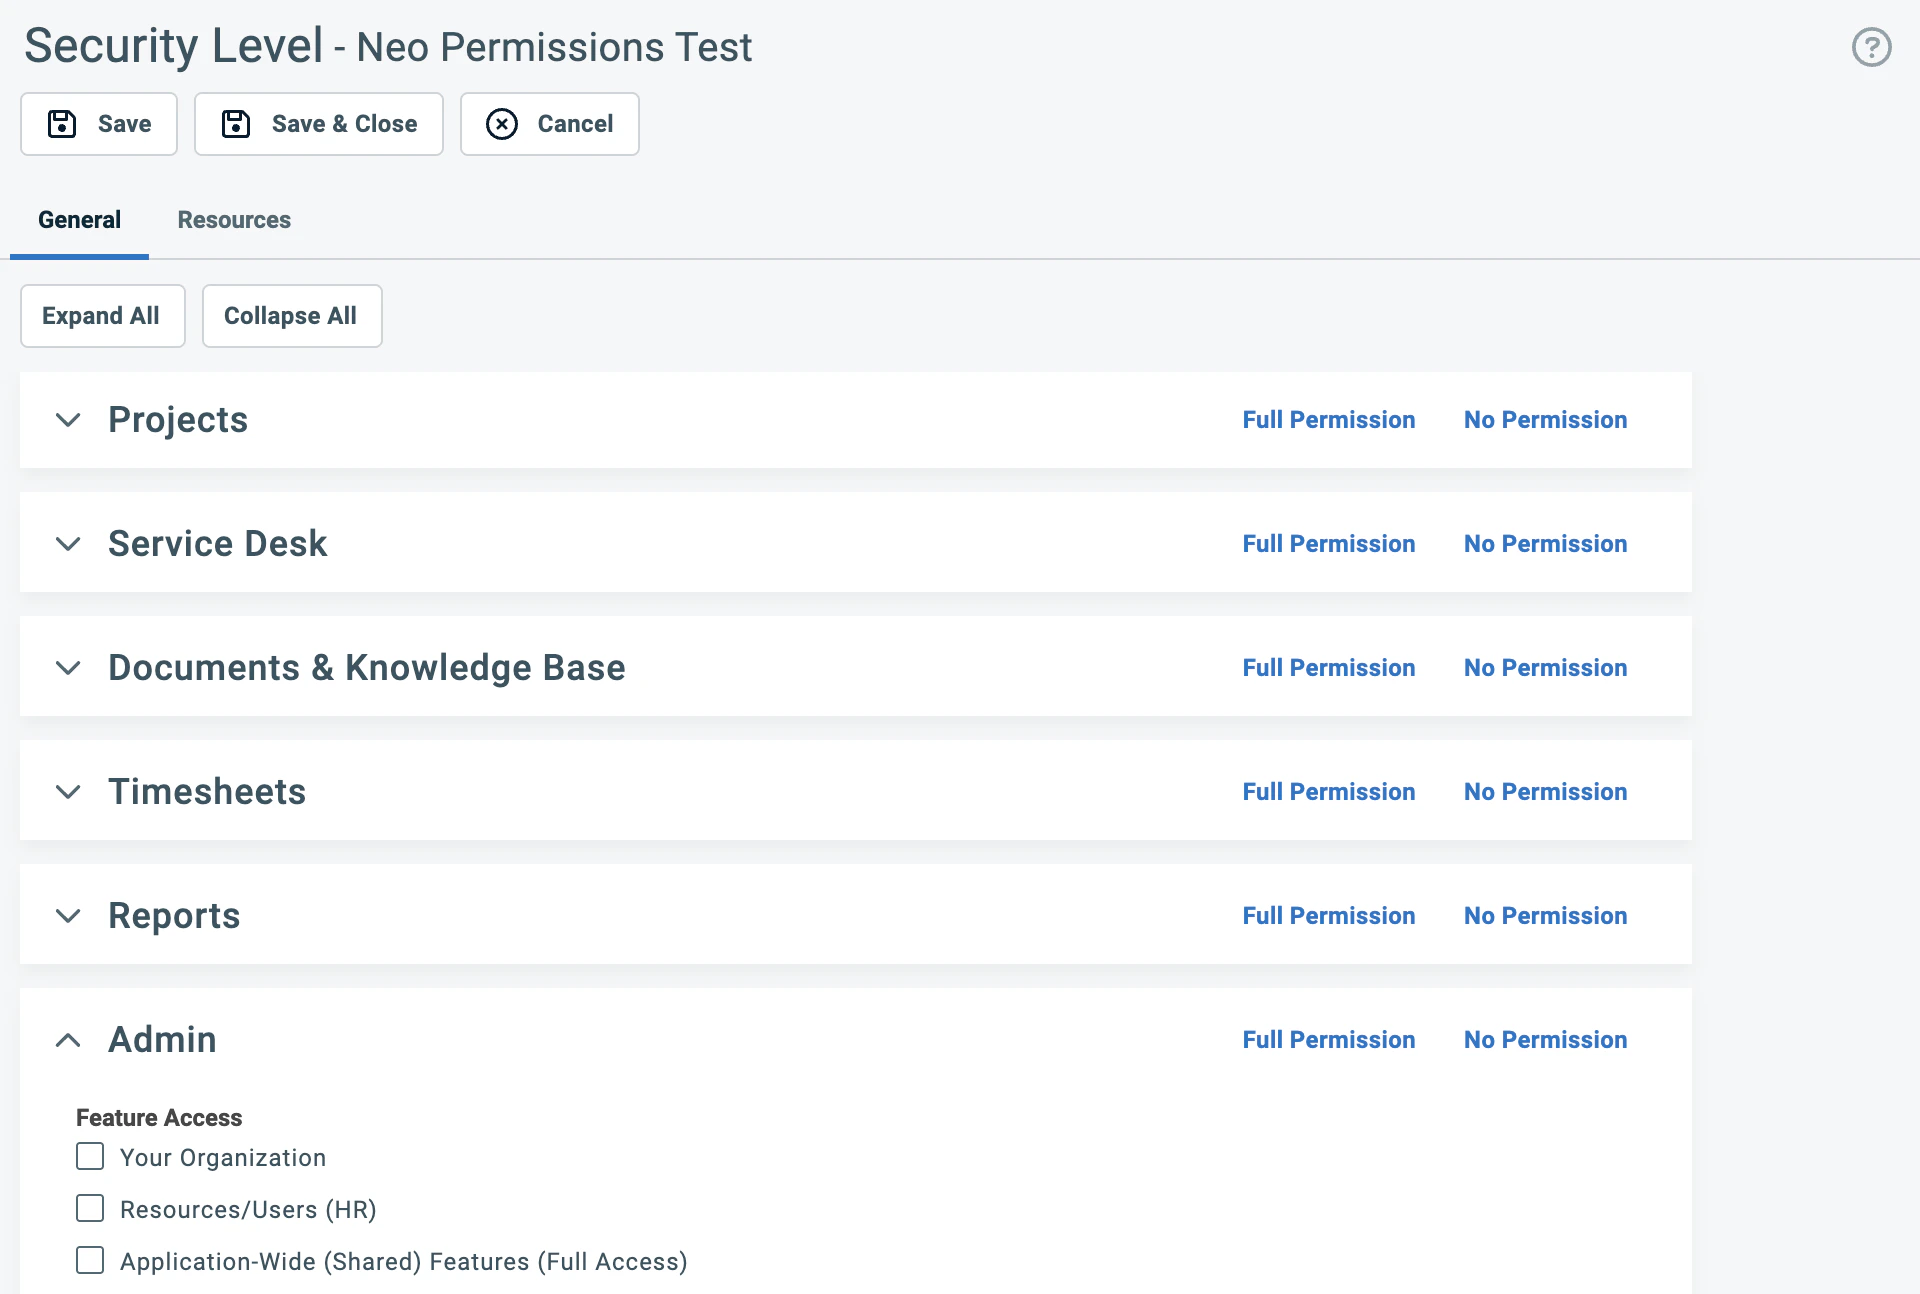
| Section | What it covers |
|---|---|
| Contracts | Contracts, Services, Service Bundles, Billing Codes, Milestones |
| CRM | Organizations, Contacts, Opportunities & Quotes, Sales Orders, Devices & Subscriptions |
| Inventory | Products, Inventory Locations, Purchase Orders |
| Projects | Projects, Task Notes, Charges, Expenses |
| Service Desk | Tickets, Ticket Notes, Service Calls, Charges, Expenses |
| Documents & Knowledge Base | Knowledge Base Articles, Documents, Article Notes |
| Timesheets | Time Entries and time-related settings |
| Reports | Standard report access across all categories |
For Reports, clicking “Full Permission” is fine — report permissions are read-only by nature.
Grant write access (Add and Edit)
Click “Full Permission” on the following sections where Neo Agent needs to create and update records. These are the core areas Neo uses to resolve tickets, manage time, and handle day-to-day operations.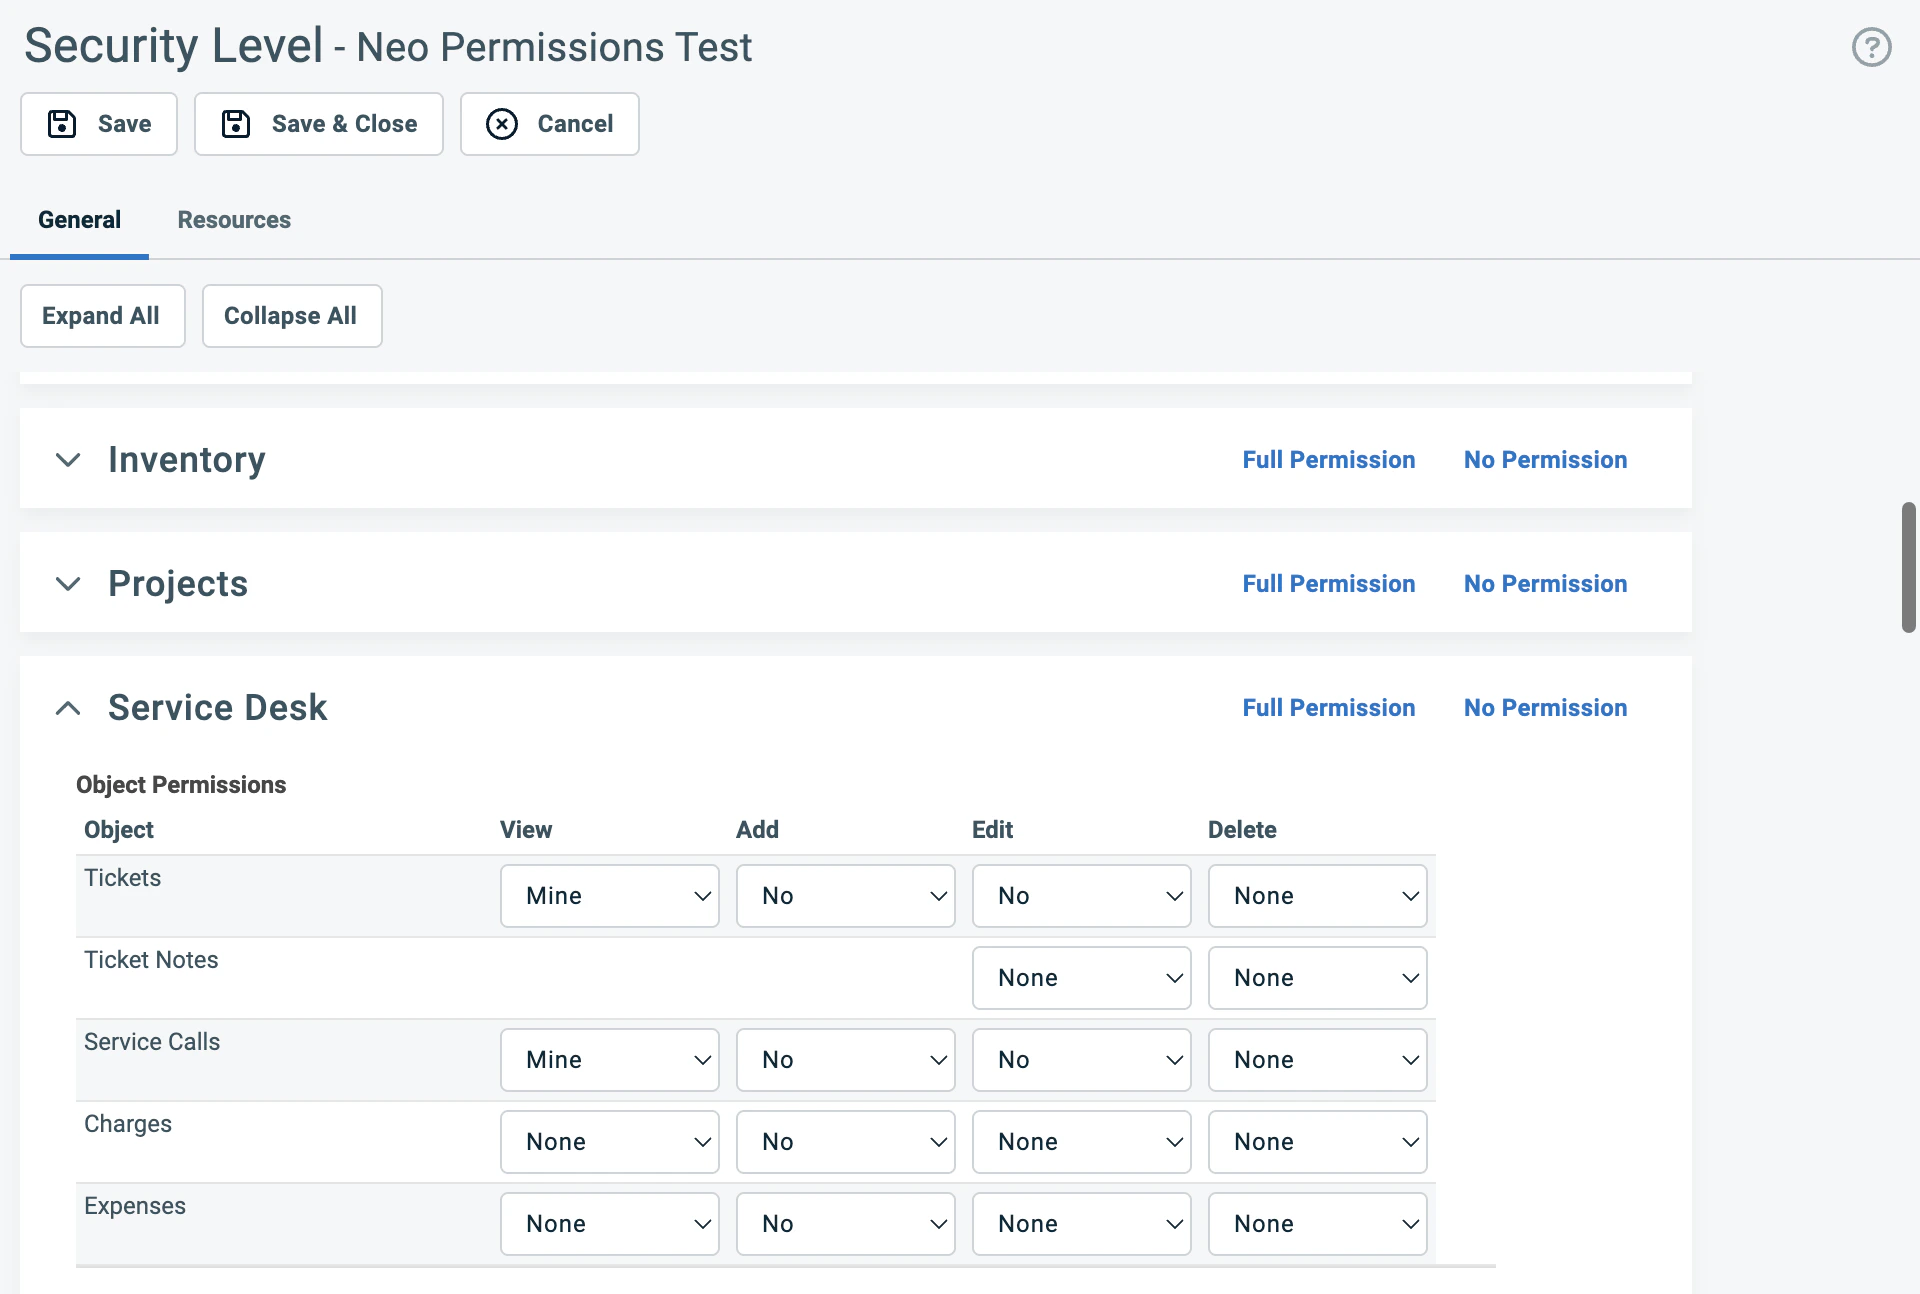
Service Desk
Click “Full Permission”. Neo Agent needs full access to tickets, notes, service calls, time entry permissions, checklist permissions, and related settings.CRM
Click “Full Permission”. Neo Agent needs to read and update organizations, contacts, devices, and notes.Projects
Click “Full Permission”. Neo Agent needs to manage project tickets, task notes, charges, and time entries.Documents & Knowledge Base
Click “Full Permission”. Neo Agent reads and references articles and documentation.Timesheets
Click “Full Permission”. Neo Agent creates time entries when performing work on tickets.Configure Admin section
The Admin section uses checkboxes for each feature access category. Click “Full Permission” to check all categories — Neo Agent reads admin metadata (UDF definitions, SLA configurations, entity info) to resolve tickets accurately.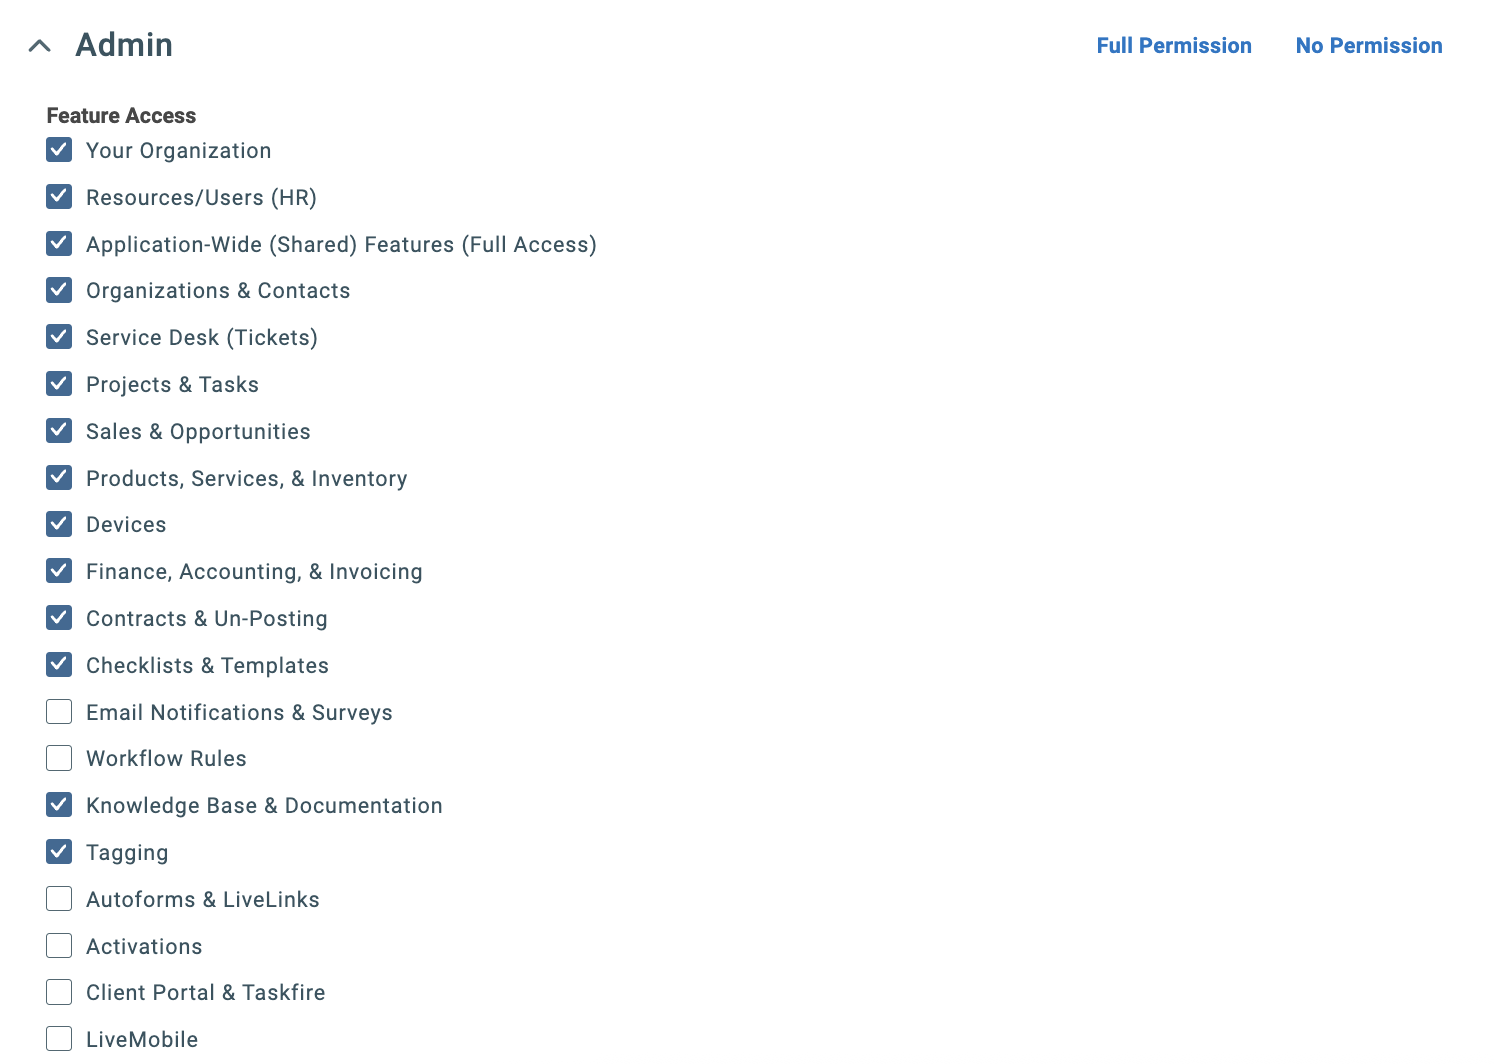
Configure Other section and enable webhooks
The Other section contains dashboard permissions, survey settings, resource visibility, form templates, and webhooks. Click “Full Permission” to enable all settings.Then verify these webhook settings within the Other section:
- Can create Webhooks: Checked
- Maximum number of Webhooks: Set to 5
Webhooks allow Neo Agent to receive real-time notifications when tickets are created or updated in Autotask, enabling faster response times and more efficient automation.
Configure Web Services API section
The Web Services API section has three parts — work through each one.1. Feature Access (top):
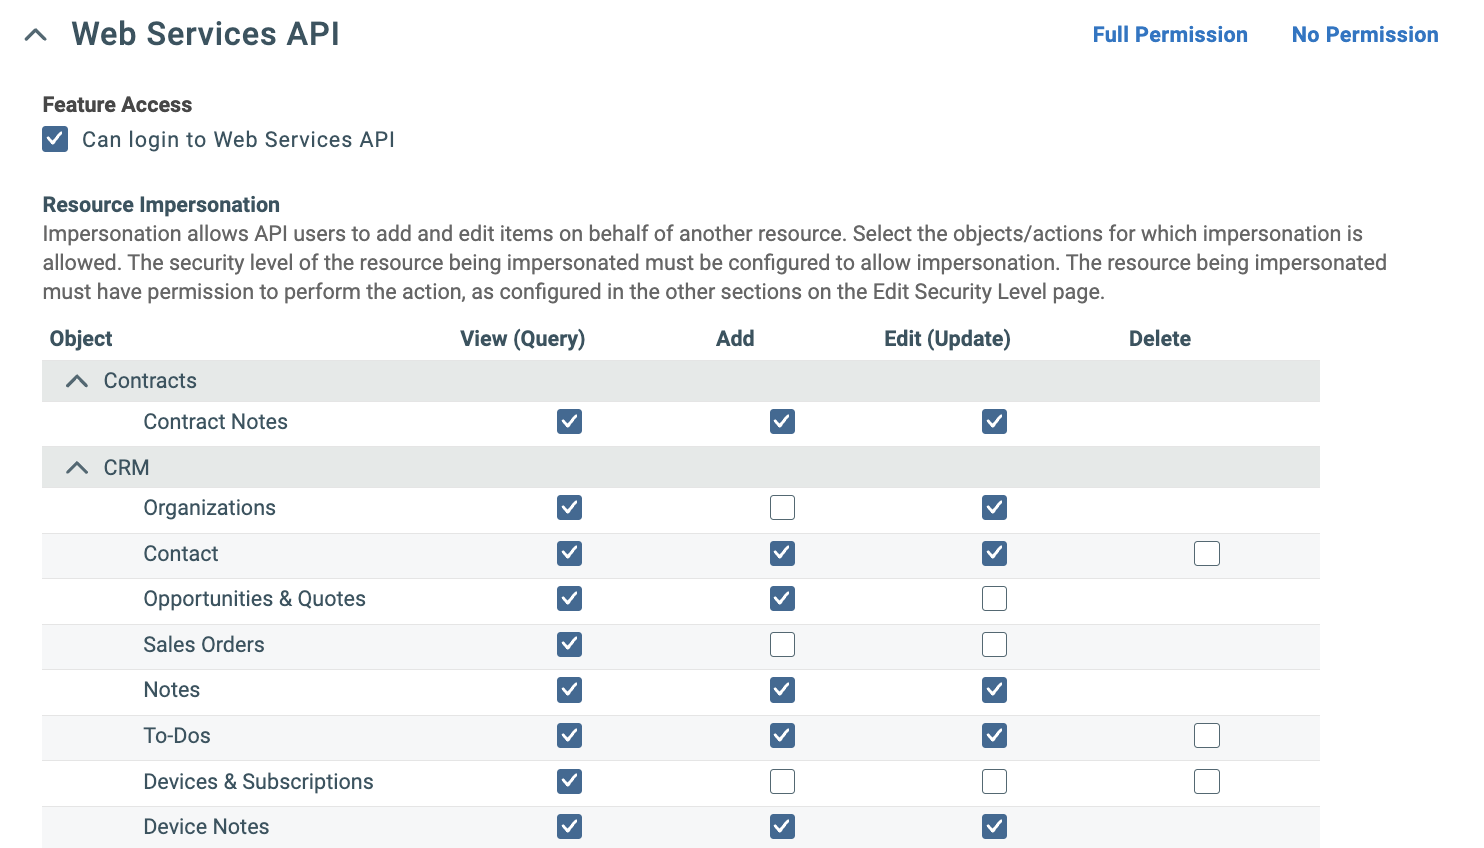
- Check Can login to Web Services API (usually enabled by default if you copied from API User)
| Category | Objects |
|---|---|
| Contracts | Contract Notes |
| CRM | Organizations, Contact, Opportunities & Quotes, Sales Orders, Notes, To-Dos, Devices & Subscriptions, Device Notes |
| Inventory | Inventory Locations, Inventory Products, Purchase Orders, Products, Product Notes |
| Projects | Projects, Project Notes, Task Notes |
| Service Desk | Tickets, Ticket Notes, Service Calls |
| Other/Shared | Attachments, Time Entries |
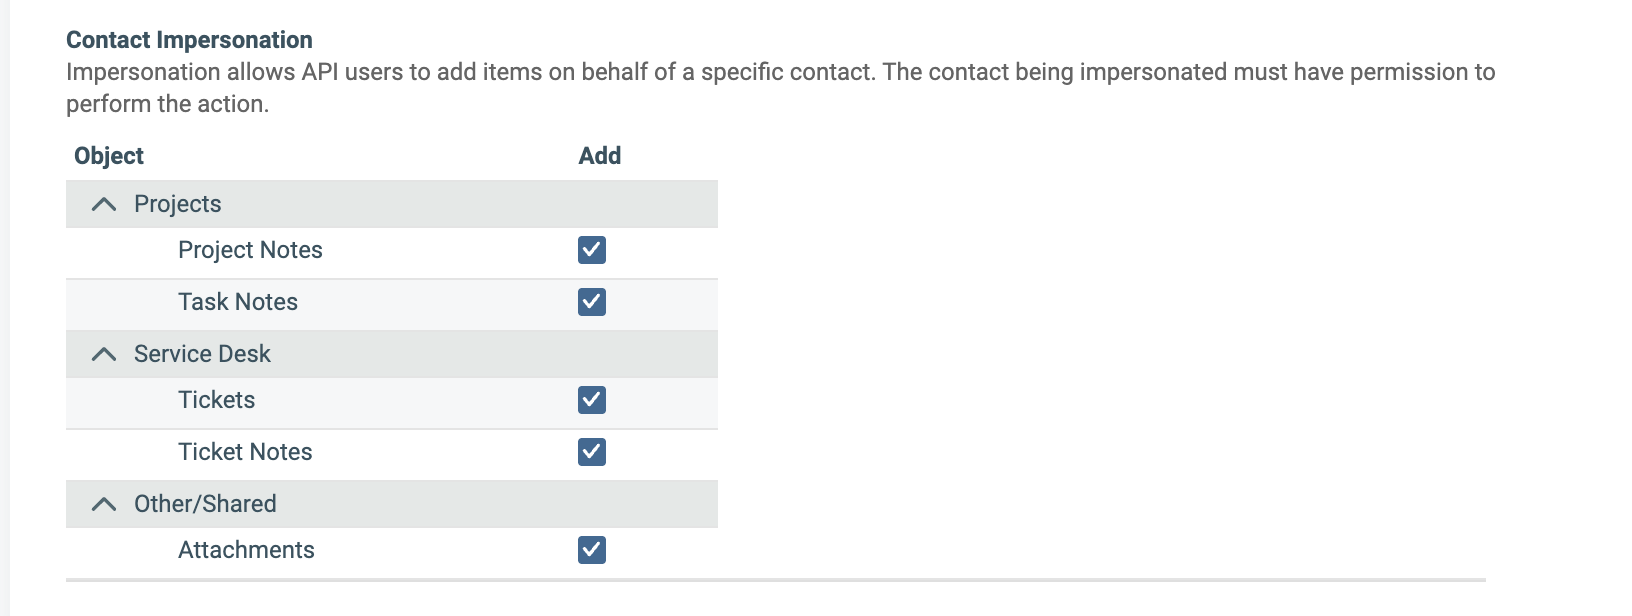
| Category | Objects |
|---|---|
| Projects | Project Notes, Task Notes |
| Service Desk | Tickets, Ticket Notes |
| Other/Shared | Attachments |
Contact impersonation allows Neo Agent to create ticket notes attributed to end-user contacts (e.g., when a customer submits an update through Neo Pulse). This triggers Autotask’s “Customer note added” workflow events, ensuring technicians receive proper notifications about customer updates.
What’s Next?
Once you’ve successfully created and configured the security level, proceed to create the API user and assign this security level to it.Before proceeding, verify:
- Security level is named “Neo API User” with License Type “API User”
- All module sections have read access (View = All)
- Service Desk, CRM, Projects, Documents & KB, and Timesheets have full write access
- Web Services API has Resource and Contact Impersonation enabled
- Webhooks are enabled with a maximum of 5